Thursday, August 30, 2012

My Bathroom Vision

After spending two years and hundreds of hours on Pinterest I have finally compiled all of my inspiration for the bathroom remodel. If you read my post 10 Things I Hate About My Bathroom you would have some background for where these ideas are coming from.

The floor.


This beautiful floor came from for the love of a house blog. I love the classic look of the 2 inch hexagon tile and the gray. Oh the gray. Now if I can just find similar tile closer to my budget.

Lighting.


We have a ceiling light above our sink which is not very common for bathrooms. I found this one at Lowes. Not sure if it will be the best because it only has one bulb and I already think its too dark in there, but if I can find something similar but bigger it would be perfect!

Vanity Top.


Ok, I already bought my vanity top last Black Friday so its sitting down in my basement. This is pretty similar to that one, found on A Country Farmhouse, but maybe alittle darker. Just wanted to give you an idea of what we're working with.

Faucet.

I'm dying for a new faucet so I have to put this on here. A leaky faucet can drive a sane person to the nut house. This one is from Lowes, has a decent price with pretty good reviews.

Backsplash.


As much as I like tile I wanted to make sure to add some beadboard into this project. Our vanity built in and I'd like to have the back backsplash be an entire wall of beadboard. This is a pretty good example I found from House of Turquoise.

Vanity.


I'm planning on refinishing our existing vanity. I love the color of this vanity from DecorPad, so I just need to figure out how to get this look without having to put in too much work. Thinking gel stain...

Shower.


At first I was just going to get the same ol' fiberglass shower surround but I've decided that we need tile. If I can find a tile close to this shower from Houzz or even a white tile I will be happy. If we're doing a remodel we should atleast put in that extra effort.

There are a ton of other details that are going to need to go into this but you get the jist. Now I have to consult with Ryan to make sure we're still on the same page and I can really start shopping around. This has drug on long enough so it's on the calendar to rip that shower and tub out come October!

Wednesday, August 22, 2012

My Lucky Stars

One of the finishing touches that has been driving me up the wall is my dining room wall. Ever since we did the kitchen/dining redo it has been blank and dying for some attention. I had a ton of ideas up my sleeve but everything I came up with Ryan hated. I don't depend on him for decorating, however, if he hates something I won't do it. So I pushed aside my ideas for picture frames and white plates and decided on tin stars. And guess what. Ryan didn't hate it! I was inspired by these stars on The Yellow Cape Cod post of 31 days of building character

 
My only problem was now finding the stars. After some research I came to the conclusion that my budget would be around $60 to get three stars on the wall. Ugh. Lucky for me I came acrossed a great deal on Amazon.com for a set of three for just over $30! The only thing was that they weren't black. Oh well, I've got a can of black spray paint right down stairs! I ordered them and they were here in 4 days. I opened the package and got to work.
 

I laid the stars down on the box they came in...


Spray paint is like magic. While I waited for the stars to dry I went inside to figure out exactly how to hang them. Before I painted them I traced the stars on some extra cardboard and cut out the pieces. Put some tape on the back and started rearranging the stars all over the wall. I finally decided on this.


So I pounded some nails in at the top of each star and headed back outside to get my stars.


Much nicer than the cardboard huh?


I can't believe what a huge difference this made and the project only took 30 minutes!


Hanging a star on your house symbolizes pride in ownership. I think that fits our home better than anything. I'm so happy Ryan challenged me to think a bit more outside of the box.

Sunday, August 19, 2012

Rock On!

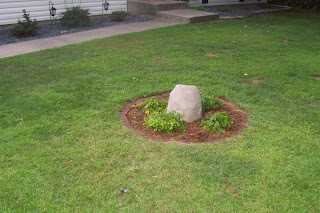
I had a quick fun project this weekend that I've wanted to get to for a few months now. Does anyone else have a well cover right in the front of their house? They are so hideous and I'm sure theirs a reasoon for the location of the well, but it can be a pain to hide. This is what mine looked like.


It's just what I want people to see when they come over. Great first impression. There seems to be some hostas trying to grow along with some weeds?


Cute. So I set off to Menards and got myself a fake rock that is made to cover unsightly things in your yard. On top of that I needed some new plants. The lame hostas weren't working out and nothing is more obvious than random fake rock in someone's yard. I wanted to get some perennials that would make it seem like more of a natural feature. Menards didn't have crap when it came to perennials so I caved and went to Mickman Brothers. Boy was I happy I went there. Way better than anything I've ever seen at Menards!


The Foamflower's are only supposed to grow 12 inches and the Sweet Woodruff's get to be 9 inches. Percisely the size I need for this small area.


What a difference! By next year these will be look so perfect!


I LOVE perennials and the different varieties out there.  Don't feel like you need to settle for the basics all of the time. I tend to gravitate towards a variets of different plants that will set my gardens apart from the rest. But don't expect me to remember the plants' names, all I know as that they are pretty. Isn't that all that matters?

Monday, August 13, 2012

10 Things I Hate About My Bathroom

We're getting close to two years in our house and the only thing we have done to our main bathroom is get a new toilet. The only reason we even got a new toilet was because the one that was here had a crack in it. The bathroom makeover has been long overdue and we are finally going to start tackling it this Fall. We're just trying to finish up some tinier and cheaper projects while we save money to do so. In the meantime I am going to gag everytime I have to go in there (which is multiple times a day of course.)

1. Spindles - Yeah, we painted them white along with the rest of the trim but they definitely need to go. My mom goes, "We had these same spindles in our trailer in Oklahoma back in 1983." I've got a few ideas on what to replace them with but if anyone has any suggestions do not hesitate to speak up!


2. Sink and Faucet - The sink is that nasty tan color that also sports a nice rusty spot. My faucet gets to leave on that rusty spot all day unless I use my entire weight to tighten knob.


3. Bath Fan - Not only does it look hideous, it also sounds like a jet is taking off everytime you turn it on.


4. Heat Vent - Yeah, it's an easy fix to just pick up one but these shopping lists pile up! It rattles all winter when the heat is on and there's about 5 different colors on paint sprinkled on it from the previous homeowners.


5. Flooring - If I puked on it it might look better.


6. Lighting - The light likes to flicker on and off periodically even if you just put a light bulb in. Also, the light doesn't shine towards the shower so it's a dark cave when you are showering. Maybe put a light in the shower too?


7. Shower and Tub - Ugh, such an ugly color. Plus, I would also like to fit my entire body under the water during a bath. Thanks.


8. Bath Faucet - Not only is it the most confusing shower ever, the knobs are so hard to turn I sometimes have to use a towel to get a good grip.


9. Hardware - These are just so industrial. I need some character too please.


10. Vanity - Not only is it super faded oak, but it doesn't have any hardware. Surprise, surprise. On top of that its not the biggest vanity in the world so the insides need an organizational overhaul.


There you have it. I finally revealed our ugly bathroom.  I'm embarressed but happy to finally let it out. I've been compiling some inspiration that I'm really excited to share soon.

Sunday, August 12, 2012

Shutters That Made Me Shudder

Sometime last week I was sitting there at work and I thought to myself, "I need to paint my shutters". Where that came from I don't know but it stuck and I knew if I didn't start I would drive myself crazy. I didn't know a thing about painting shutters (mine are vinyl) so I wanted to make sure I did it right. After doing some research online I came to the conclusion that I needed exterior acrylic latex paint. Weird, that's what I already had at home from painting all of my doors. Yes, you guessed, I wanted to paint my shutters black. This is the last thing that I need to do to really pull everything together.


Here are the burgundy/maroon shutters. The gutters and soffits also match so at first I wasn't sure if it would work to change the shutters, but then I realized that black would actually compliment them so I wasn't worried at all. So last Friday we took them all down, all 14!


Boy did it look plain without the shutters. It's amazing how much of a difference they make to the house. After cleaning off a bunch of wasp nests and frog poop I got to work on painting them all. It was absolutely exhausting and very discouraging when I realized I needed to do a second coat. Ugh. It's ok though because it was totally worth it.


Ahhhhhhhhhhhh.


I love how it matches the black hardware on the garage.


See the burgundy, it actually goes together pretty nice if you ask me. There are just a few things on my to do list for the front of the house and this place is going to look brand spankin new!

Saturday, August 11, 2012

I Am The Stair Master

I'm alittle disappointed that I don't have a before picture for this project but I still need to share. The night we closed on our house the first thing we did was start to rip out the carpet. I didn't think to take any pictures before doing so. I was just so excited! There weren't any MLS pictures of the stairs but I can atleast show you what it looked like from the living room view.


Here's what the room looked like after we took down those valances, painted the trim, and replaced the floor.


Now that was the easy part. The piece that has taken forever were the stairs. We chose laminate wood floors for the house because we didn't want to deal with the scratches that would result from our two dogs' nails. Problem is that laminate wood floors are basically impossible. So we got some oak treads and stained them to match as close as we could to the laminate. We picked a winner! Minwax Red Mahogany. Phew.


We replaced the railings with a fancy new one from Menards and stained that the same color. The problem was that it still seemed like something was missing. Then it hit me, stairs are supposed to have trim going down the sides. I believe they call it a skirt.


Problem is that these are put in BEFORE you put your stairs treads in. CRAP! Now what? Time to get creative. After some research on the web I came up with a solution. Faux stair skirt! Like this on Take The Side Street blog


I called my dad the come over and cut some pieces of trim, nailed them on and I colored (painted) the rest in. Ta da!


I couldn't be an happier! This is one of my most favorite projects so far. After almost two years our stairs are finally complete.