Never did I think we would turn into those people that spend their weekends and a fortune on keeping their lawn beautiful. The day has come.
This is definately a large task and not something that you finish and are done with. Pretty much a lifetime commitment... So while Ryan's been playing around with the best way to trap gophers and moles I've been figuring out how to get dog urine spots fixed. How urine can burn grass is beyond me!
I've ripped out all the dead grass, reseeded, and watered. Come on, no one can constantly do this, it would drive a girl crazy! Then one day while wondering the aisles of PetsMart I can across these dog biscuits.
I didn't believe they would work but I figured it was worth a try, and the dogs needed some treats anyways. They are a bit more spendy than normal treats so I decided to give the dogs each half of one everyday. What happened? No more burn spots! Seriously. We recently ran out and I never found time to buy some more. We now have burn spots again. Ugh!
Never again will I let myself run out of these magical treats, it's just not worth it. Now me, Ryan, and the dogs will all be happy.
I hope everyone has fun weekend and doesn't spend all their time working on their lawn.
Saturday, June 30, 2012
Tuesday, June 26, 2012
Patio Door Completed
We finally made some more progress on the finishing touches of our kitchen. I have been searching for months and months and months for a patio door curtain that was the right color, width, and price and with the lovely help from Pinterest I found it. You wouldn't believe where; LTD Commodities! Seriously. I'm not usually a fan of their products but this time they came through. I was able to get a shear curtain in the color I needed for only $20 plus shipping.
The best part about it is when its closed you can still see outside. We have a lot of privacy here so we don't have to worry about neighbors looking in on us while there sitting in their living room. It does distort the view though just in case a passerby does try to peer in. So when we first started shopping around for a curtain rod I had my mind set on black. Of course, that was the hardest task ever. Only brushed bronze, no black. That was when my Ryan pointed out some wood curtain rods at Lowe's. We picked out the Allen Roth collection and it worked absolutely perfectly for our dining room.
And I thought my dogs weren't photogenic. Silly me.
The best part about it is when its closed you can still see outside. We have a lot of privacy here so we don't have to worry about neighbors looking in on us while there sitting in their living room. It does distort the view though just in case a passerby does try to peer in. So when we first started shopping around for a curtain rod I had my mind set on black. Of course, that was the hardest task ever. Only brushed bronze, no black. That was when my Ryan pointed out some wood curtain rods at Lowe's. We picked out the Allen Roth collection and it worked absolutely perfectly for our dining room.
Other than that, I've been crawling around my yard taking photos of the dogs so I can hopefully get some framed and up on the wall soon. Who says you can't frame photos of your dogs?
Here's Murphy
And here's Windsor
And I thought my dogs weren't photogenic. Silly me.
Sunday, April 22, 2012
A Garage With Personality
I know, I know, I haven’t blogged
in forever! The reason being is that there hasn’t been much for projects around
here over the cold months. My husband is in construction so when he’s not
working I then have to stop working on making my house my dream house. Now don’t
get too excited, we haven’t started doing anything big yet but we are
definitely working on some improvements. There wasn’t much time last summer for
us to work on the outside of our house so we are hoping to tackle a ton more of
that this year. Including a vegetable garden! Well, we are going to get the
garden ready for next year. Sorry, no veggies this year guys. This is what we are thinking of, more to come about that later...
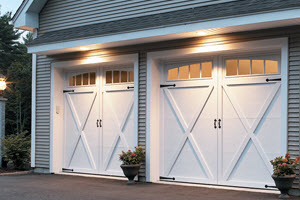
So after attaching the new
hardware and spray painting my plant hooks to match I have a garage with some
personality! All for only $50!
One thing that has bugged Ryan
about our house since the day we signed the closing papers is a dented garage
door. Not sure how it was dented but the bottom panel needed to be replaced.
Since we were improving the look of the garage I figured we might as well add
some character. Our garage is so bland it almost looks like a storage unit. I’ve
always like the look or carriage garage doors but there is no room in our
budget for that L.
After searching around on
Pinterest for a different idea I came across a blog post on 320
Sycamore. Melissa explained how she updated her garage to have the carriage door look, so I followed her
instructions and went straight to eBay to order my supplies.
This is a horrible before picture
of our garage from when we bought it. Sometimes I just get so excited to update
stuff I forget to take those super important pictures. But now you have and idea of how boring they looked.
Now I cannot wait to get some
hanging flowers to really see the finished product.
Come on warm weather!
Saturday, January 21, 2012
Splash of Blue!
Ok, I haven’t been able to pull myself out of the kitchen yet, there are just so many details and I’m really obsessed with giving rooms personality. I’ve decided to add acouple punches of color to the room to keep it fun and colorful. Since there’s already blue in the floor I decided to run with that. I started with this white pitcher that I picked up at IKEA one day with no particular use in mind. Then ran over to Michael’s and grabbed a bunch of blue hydrangeas (fake of course) and stuck them in. Pretty easy for such a great look!
Next project I needed to put alittle more effort into. While I was pinning like crazy on Pinterest the other day I came across the most brilliant idea. DIY fabric covered roller shades! I have never purchased fabric in my life and the only thing I know how to sew is a button but this only required fabric glue. After spending two hours at Joann’s Fabrics looking at every piece of fabric that had any blue in it I FINALLY made a decision. I followed the tutorial and as you can see it turned out amazing! I can’t believe I actually did this.
One thing that I will be sure to do in the future is buy the heavy duty shades. I bought the medium weight ones and the spring just isn’t strong enough to roll up the extra weight of fabric. It is fine with me considering I wasn’t planning to pull this shade down anyways, I was looking for more of a valance look, but for my other windows I will definitely be using heavy duty.
I'm really trying to focus on personalizing our home lately. My new obsession is to hang more photos around the house of our wedding, dogs, etc. More to come...
Sunday, December 11, 2011
The Kitchen Project...Finished
The kitchen remodel is final finished! What a pain! This whole project seriously took way more work than I thought it would take but I am definitely glad we did it. It feels like a brand new house now. Now here is the kitchen before. This picture was actually from the listing when our house was up for sale.
2. Installed a dishwasher
Here’s a close up of the kitchen sink area.
Our dining room before.
Dining room after.
Here it is after!
This is what we did:
1. New appliances, including a built in microwave (gotta save counter space!)
3. Light fixtures
4. Added a peninsula with new countertops
5. Replaced old hinges and added pulls on all the cabinets and drawers
6. Updated kitchen faucet
7. Used beadboard as a backsplash
8. Painted trim to match the rest of the house, Behr Creamy White
9. Beadboard is painted Behr Country Beige and the walls are painted Behr Cornsilk
There is a ton of finishing touches to do to personalize the space but right now I am taking a break from the kitchen. The only thing that’s going to happen in there these next few months is baking and cooking. Now about that bathroom...
Monday, November 14, 2011
Tortellini Please
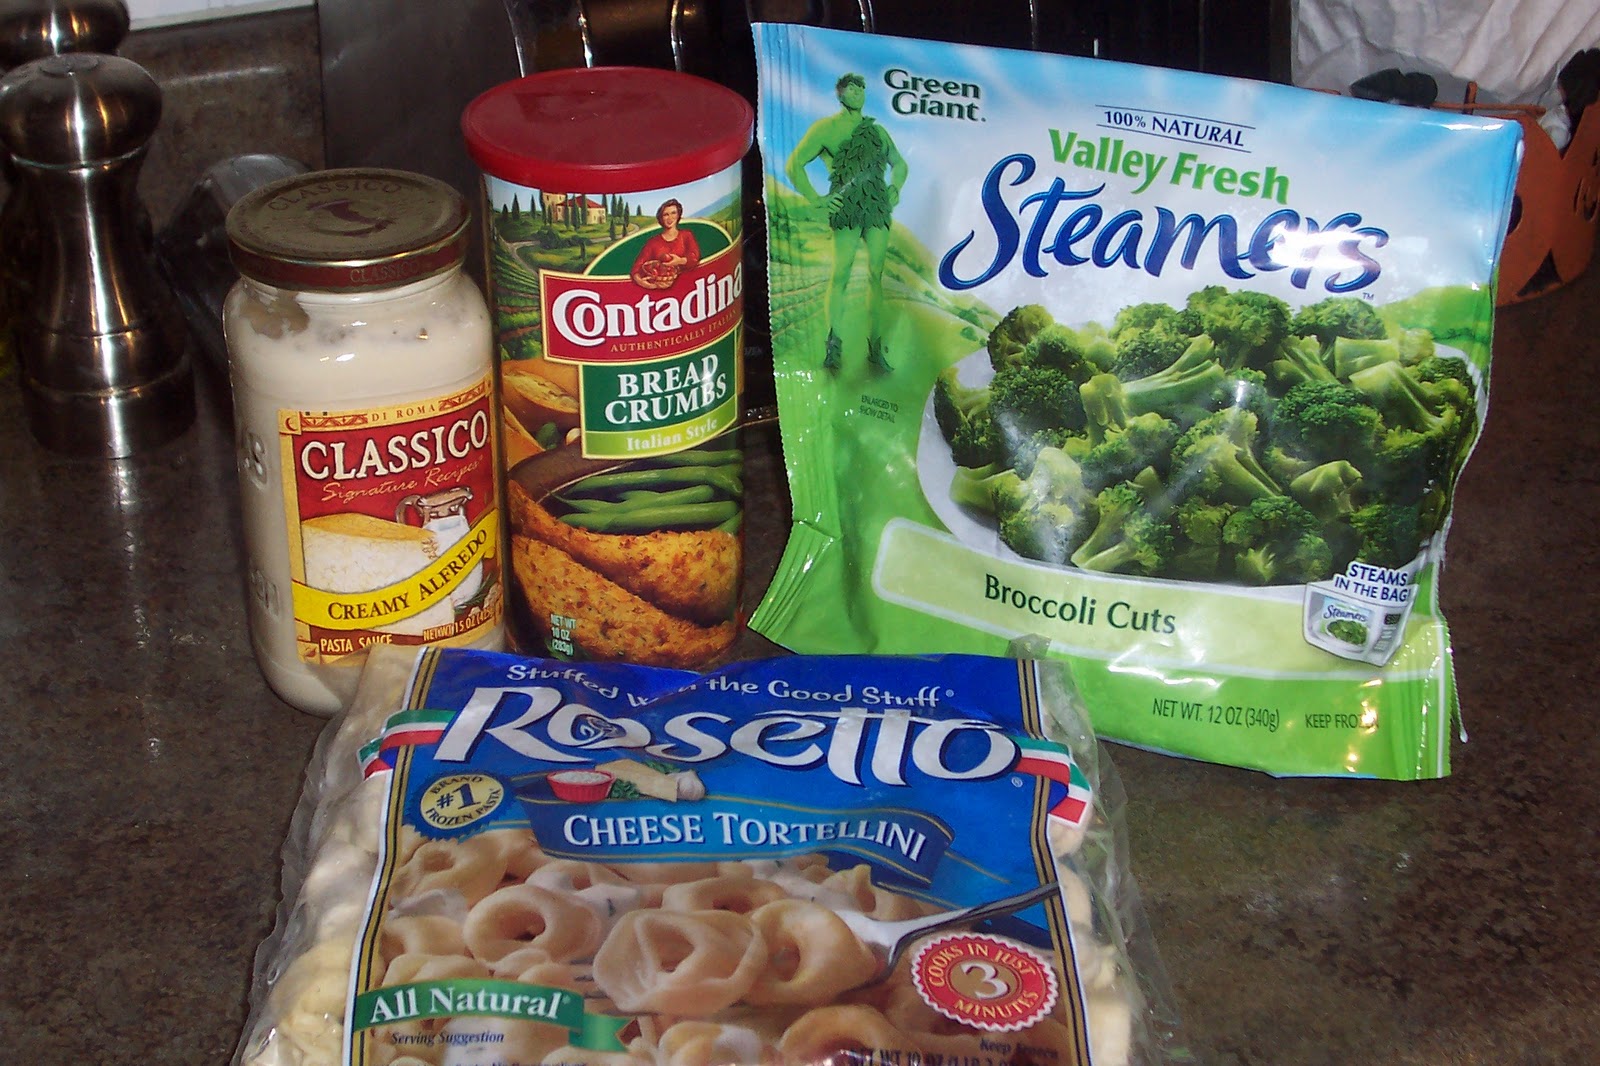
Do you ever come home to make dinner at night and think “Oh, well this casserole will be easy!” but then realize that after preparing everything it needs to bake in the oven for another 30 minutes? Well it happens to me all the time. Don’t get me wrong, I love my hotdishes but I need a quick hearty meal every once in a while. So I came up with this Tortellini Casserole.
This has been a staple at my house and I never have any complaints. It’s also really easy to throw together if you have some unexpected guests. Enjoy!
1 package (19 oz) frozen cheese tortellini
1 package (12 oz) broccoli cuts
1 tablespoon butter
¼ cup Italian style bread crumbs
1 chicken breast (cooked and cut up into tiny pieces)
1 jar (16 oz) Alfredo sauce
2 tablespoons shredded Parmesan cheese
Boil tortellini as instructed on package. Drain and return to pot and add the alfredo sauce and chicken, keeping it on low heat to heat up the alfredo. Meanwhile, microwave the broccoli cuts as instructed on the package. Add cooked broccoli to alfredo mixture.
In a small skillet melt the butter. Add the bread crumbs and stir them around to coat them. Cook for about 1 minute to brown the breadcrumbs, but stir constantly.
Take out a large serving bowl and empty the entire pot of tortellini into it. Top with the breadcrumbs and then the Parmesan. Serve immediately.
Sunday, October 23, 2011
Save The Counterspace!
While I have been patiently waiting for the final project to start in my kitchen, the walls, I have been brainstorming and strategizing new and fun ways to make my kitchen more organized. Like I’m sure I’ve mentioned before I have a lot less cupboards than what I’m used to. You wouldn’t believe the feeling you have when you go from having a pantry to no pantry at all. It takes some extreme creativity. My first step I took was figure out where to put my onions, garlic, and potatoes that can’t go in the refrigerator. They were too big and bulky for my food cabinet and I didn’t want to use up counter space to our found that awesome tiered basket at HomeGoods. I didn’t want it to sit right on the floor so I stopped over at Michaels and grabbed one of their wooden crates and just slapped on some of the same stain I used to finish the cabinets. Easy peasy.
The next thing I needed to tackle was my recipes. Mostly everything I cook I find the recipes online so I had a huge pile of papers that I’ve printed out throughout the years taking up much needed space in one of my cabinets. I cleaned out my mess and sorted through all of the recipes. I threw away ones I will never make again, and then sorted the rest in categories; easy dinners, weekend dinners, salads, appetizers, and desserts. I decidedly that instead of sorting alphabetically I would sort them by the ones I use most often for easy access. We’ll see how that works. Next was to place them all in plastic sleeves and put in this adorable 3 ring binder I got at Target. This was definitely something I didn’t mind keeping on my countertop. I use it almost every day so why hide it?
Not sure if I’ve mentioned this before but I only have five drawers in my kitchen and two of them are tiny. I was really struggling with fitting all of my towels and washcloths in a drawer, they just wouldn’t all fit. The first step I took was to take everything out and see what I didn’t really use anymore and brought those down to the laundry room to use as rags. Then I took all of my washcloths and rolled them up and put them in this white enamel bin I got at Ikea. I put this right next to my sink so I can easily rad a new one and they look super cute!
One thing that we do every morning is make coffee and I’m sure most of you do too. So why have coffee filters one place and coffee in another. I was given this Halloween themed basket as a hand me down from my mother in law and put it to use. It sits next to our coffee maker and keeps everything together so I can make my next cup. Now I’m going to have to find a new basket for when Halloween’s over…
When we first moved into our house and I was trying to get organized I bought a breadbox. The problem with this is that we go through a lot of bread around here (I love carbs) so I was actually having to put bread on top of my breadbox because it wouldn’t all fit. Now that doesn’t make sense. I ditched the breadbox and went to Michaels and found this linen lined basket (it matches my door curtain and my light fixture shades) and have been throwing all of my bread in there. It has been working perfectly!
I really wanted to point out how important it is to keep your kitchen organized and how crucial counter space is. I see all too often beautiful kitchens online that have all this cute decorative things all over their counters. As much as I would love to have a statue of a rooster sitting by my toaster I just don’t have the room. The key is to figure out what you need to organize and try to put a decorative spin on it. Killing two birds with one stone.
Subscribe to:
Posts (Atom)